Warm Weather and Silk Dying
There is nothing better than the warm sun beating down on us to invigorate and recharge the batteries of the soul. With this snap of warm weather I have found a renewal of the joy of dying silk…. loving that the warm sun gently but quickly dries the fabric, allowing for quicker reveal of the final results.
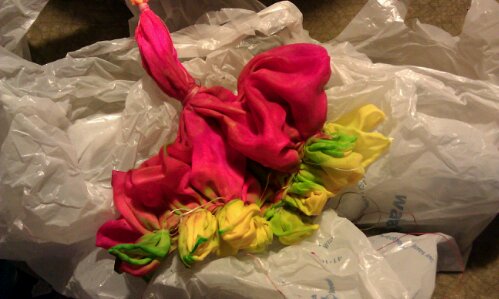
After spending an hour binding up a few pieces of silk, it was a pleasure to add dye, and lay the bound pieces out on the warm sunny part of my front porch to dry. (By now the neighbors have grown used to me painting, dying and doing all kinds of artistic things on my front porch!) Frequent stops to rotate the pieces allowed them to dry quicker.

Looking like psychadelic sausages, these pieces of silk slowly dried, awaiting the bindings to be removed.

While I have a simple plan for how the silk will look, I must tell you that silk dye will surprise me at times, either refusing to blend when two colors meet, or will break, giving a veining, or striking pattern that was not in the plan. Those happy accidents are usually never reproducible because there are so many factors playing into the outcome – humidity, temperature and location i am working, and the actual silk and lot of dye.
So what are the factors that affect outcome of dying?
- Weather conditions (hot or cold, humid or dry)
- Location (Is it indoors, or outside)
- Type of silk, and lot of silk
- Dye lots
- Which fluid the dye is diluted with
- What type of material i use to bind the silk
Weather is a big factor… the more humid or cold, the slower the dye dries. When the dye dries quick often there are veining and tracing of the dye… its kind of like the skin that forms on the sides of a glass when you leave milk for a time. Dye puddles, and dries, leaving a ring. So for the effect i am going for i like hot weather, because it is quicker dry times.
On the other hand, cold winter days make for softened, slowly melded colors, because the dye remains wet longer, allowing for blending and softening.
Location – Optimal for me is my front porch in the height of summer. The wind gently blowing, the sun at full height, the temperature in the mid 80s… My silk dries fast, and the colors appear to be more rich and vibrant. But in cold season i retreat to a small part of the basement, and after dying i move the silk close to the furnace vent, so the warm heat blows on it to dry it. I typically give 2 days for winter drying, whereas summer drying can be as quick as an hour.
Type of silk – There are a variety of different finishes, weights and strengths of silk. I typically work with habotai because it is lightweight, ideal for scarves, and has a nice sheen. I have worked with crepe de chine – also light weight, but without the glossy finish, this matte finished silk results in a much softer and more gentle look. Shantung, the nobby silk typically used in tailoring, will absorb dye differently because the silk fibers are shorter, and not as fluid as habotai or chameause.
Dye lots – While the manufacturers of dye strive to standardize their products, you just can’t control slight differences between each batch. From batch to batch the dye may be thicker, or less pigmented, resulting in differences in absorption, and differences in outcome.
Which Fluids Are used – Dye right from the bottle is very concentrated. More often than not it needs to be thinned down. Like watercolors, the more water the fainter the dye becomes. Water is great for immediately mixing well with the dye, and evenly dispersing it. When i want something more interesting and organic i use rubbing alcohol (ethyl) because it reacts with the dye to create veining and uneven dilution of the dye. The results are amazing and so much like nature… very organic, interesting breaks in the dye that echo a pattern found on the delicate leaves of a tree, or the veining of a delicate flower. Love the outcome.
Binding Material – All Shibori involves binding or sewing to create the resistance for the dye. I prefer to use waxed dental floss… the floss allows for close binding, and the wax resists absorption of the dye while bound. Changing the binding to a wool yarn, the dye pools in the wool, and leaves a concentration of color where the binding was placed.
So now the fun begins… the piece is dry, but still has the bindings. One by one, I remove the bindings, and begin to unfurl the silk. Every piece is like Christmas Morning! That is to say, while I have an idea of what I wanted to see in it, all of the factors come into play to give surprises and unexpected results. I promise to be better about photographing the work in progress. I got so excited about the results that I put the camera down and started into the unbinding process… before i realized i had opened up all of the pieces. I promise to be better about photographing my work in the future.
Here is one I did a while ago:

Taking the bindings off

Opening it up

Opening it up more – Once it was opened up the silk needed to be pressed, and my signature is a small amount of metallic resist detail to enhance the pattern. Metallic resist is applied through a very fine tipped tube, gently painted onto the surface of the silk. The resist has to air dry, and the entire piece of silk is wrapped in newspaper, and a blanket and steamed for 1-2 hours until the heat and steam set both the dye and the resist. A quick rinse in chemical stabilizer, and then a small amount of fabric softener, a press, and the scarf is done.

The completed scarf
You must be logged in to post a comment.